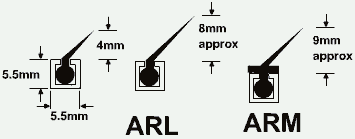
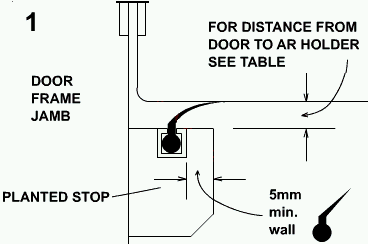
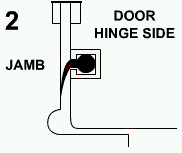
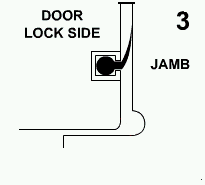
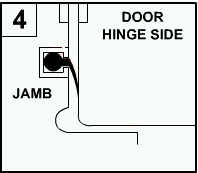
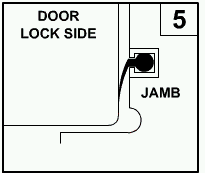
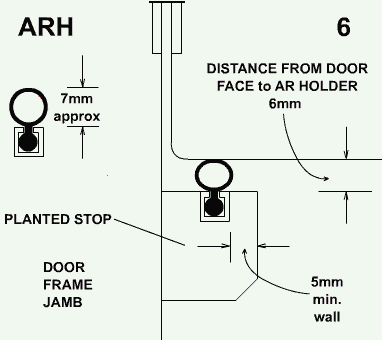
ANGLED BLADE INSERTS

ARK - ARL - ARM IN A PLANTED STOP

AR holder is a light press fit into a groove 5.5mm square. When cutting the groove it is essential to leave a wall of timber, 5mm thick minimum, between the rebate and the face of the stop. Fig.1.
The holder can be secured in place with wood glue but if it is a loose fit an epoxy type adhesive should be used
When specific cut sizes are ordered the holder will be supplied with a milled slot 100mm from one end, to allow the insertion of the seal insert. Otherwise, if ordered as a total metre run, the holder is supplied without a milled slot.
After inserting the rubber seal both ends of the holder should be crimped to prevent movement of the insert.

POSITION OF SEAL RELATIVE TO THE FACE OF THE DOOR

Blade seals are designed to function properly when compressed to approx. one third of their vertical projection when fitted.
The following table shows distance from the face of the door to the holder.
Seal ARK ARL ARM
Distance to front of holder 3mm 5mm 6mm


FITTING TO PLANTED STOPS ON PLAIN JAMBS OR EXISTING STOPS

Ensure that the distance of the stop from the front of the door is as shown in the table above, having regard to to the insert being used.
Measure dimension inside door frame at the head and cut holder.
Cut and fit sealing blade insert, crimp both ends and fix in the holder groove.
Cut and fit the seal in the side stops as described above.

FITTING TO DOOR EDGES

ARK is recommended where the gap between the door edge and the jamb is 2mm-3mm. Nothing is gained with an oversize blade in a small gap. When cutting a rebate in the door edge a wall of timber, at least 5mm thick, must be left between the rebate and the face of the door. It is important that the direction of the blades is as shown.
Figs. 2 and 3.

FITTING TO DOOR JAMBS

This is an alternative method we recommend should be done at the manufacturing stage because of the work involved. Note direction of blade seals. Figs. 4 and 5.

ARH TUBULAR SEAL

The seal is shown rebated in a planted stop. Fig.6. Correctly fitted the seal insert is normally compressed by 1mm. In practise this means that the compression of a continuous seal around a door, or window, should be only sufficient to stop draught without excess resistance.
The sequence of fitting is similar to that for blade inserts.

GENERAL NOTES

To prevent snatching of inserts on the hinge side of doors and windows the closing edge should be well rounded.
Solvent based glues, varnishes, paints etc. should not be allowed to come into contact with the rubber seal inserts.
For optimum results surfaces on to which these seals make contact should be as smooth as possible.
Door and window ironmongery: extra care should be taken where the seal may be interrupted, i.e. when fitting around hinges, casement stays etc.
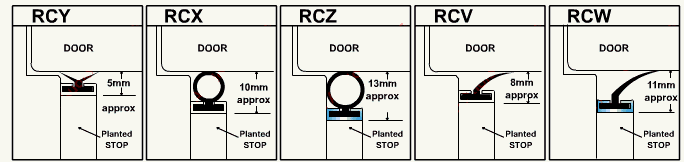
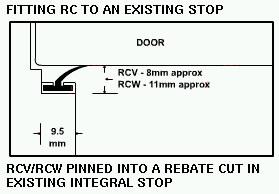
FITTING INSTRUCTIONS for RC Range of Stop Seals.

The illustration above includes a milled slot as supplied when the holder lengths are specially cut to customers requirements. Standard lengths do not have milled slots.

POSITION OF SEAL RELATIVE TO THE FACE OF THE DOOR

Blade seals are designed to function correctly when compressed to approx. 1/3rd of their vertical position when fitted. Tubular seals are normally compressed by 1mm, just sufficient to stop draughts without excessiver resistance. The diagrams below show the range of inserts available which can be used with the RC holder. The distance given between the door face and the rear of the holder when correctly fitted reflect the compressibility ratios of the seal inserts.


Normally RC is fitted to a planted stop. This enables fine adjustment of the seal position to be made relative to the door face. It can either be surface mounted or set into a groove. Fixing is by pins.
Before starting to fit the seal refer to the drawings below to identify the seal insert which you have ordered.
Measure the dimensions of a section (Fig.1) and check that the actual combined depth of the holder plus the seal insert allows for the compression ratios shown in the illustrations.
It is vitally important that provision for these sizes is made in the joinery detail.

PREPARATION Of TIMBER
Timber edges which may affect the proper working of the seal must be chamferred or well rounded to avoid damaging the insert.
The groove, into which the holder is pinned, is cut on one edge and must be accurate to the sizes of the aluminium holder (Fig. 1).

FITTING TO PLANTED STOPS
With the planted stops fitted on the head and side frames, at the correct distance from the door, measure the distance at the head between the side stops. Cut the holder and insert seal to fit and fix the holder in place across the head stop using the supplied pins.
If the holder has been cut to customers measurements there should be a small milled slot, approx. 100mm from one end. This allows the rubber insert to be installed even though both ends of the holder may be covered when installed in place.
If the aluminium strip is supplied in standard lengths it may be necessary to cut the slots as required. See Fig.1 for details.
Measure each side stop between the head and threshold. Cut the holdr to suit and fix with the pins. The milled slot can be either at the top or the bottom.
Cut and feed the seal insert into the holder through the slot and push along its complete length.
To prevent movement of the seal insert in use crimp the ends of the holder on to the insert.
Operate the door and adjust if necessary.

FITTING RC TO AN EXISTING STOP

RCV/RCW PINNED INTO A REBATE CUT IN EXISTING INTEGRAL STOP   IMPORTANT REMINDER

To prevent damaging the insert the closing edge of the hinge side of the door should be well rounded as shown. This applies particularly when fitting RCY, RCX and RCZ.

Solvent base glues, paints etc must not be allowed to come in contact with the elastomeric seal inserts.
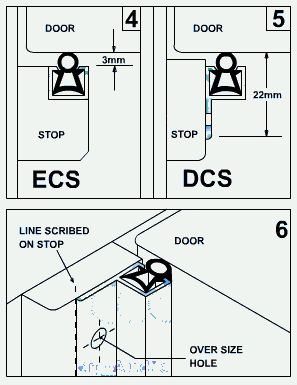
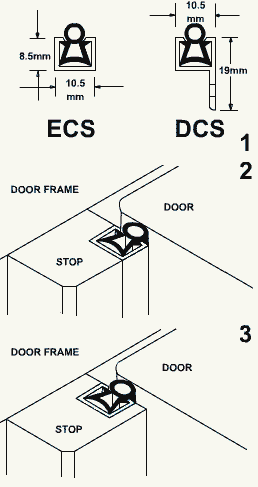
FITTING INSTRUCTIONS for ECS and DCS Door Stop Seals.

ECS

The fitting suggestions shown here are basic and apply to sealing the head and two side stops of a standard door but they may be adapted to suit other applications.
The seal is fitted into a rebate (Fig.2) or groove (Fig.3). When correctly fitted the tubular sealing section should be compressed by no more than 1mm to 2mm. The gap between the closed door and the face of the holder should, therefor, be 3mm and this distance must be maintained during fitting. (Fig.4).

FITTING

In the illustrations ECS is fitted to a planted stop.

1) Cut the aluminium holder and stop to fit across the head of the door frame.

2) Fix the holder in the stop with the supplied pan head self tapping screws. Screw the stop to the head frame, leaving 3mm between the holder and the door.

3) Cut two lengths of aluminium holder and stop to fit down the sides of the door frame between the seal fitted to the head stop and the threshold.

4) Attach the holder to the stops with the pan head screws supplied and screw the stops to the sides of the frame amintaining the 3mm gap.

5) Cut lengths of sealing insert to match and fit into the holders (se notes below).

Check that the seal operates satisfactorily by opening and closing the door, adjust if necessary.


DCS

Where it may be difficul to groove or rebate an existing stop DCS can be fitted easily and adjusted accurately.

1) With the door shut scribe a line on each side and head stop, 22mm from the door face, using the door as a guide. This method takes into account any misalignment of the door.

2) The seal is then fitted with the door open.
Cut the holder and insert to fit across the head. Fit the insert into the holder. (see notes below). Position it on the stop with the edge of the holder placed against the line scribed on the stop. Fix with self tapping screws through oversized holes in the holder.

3) Complete by cutting two lengths of holder and insert to fit between the seal fitted to the head and the threshold. Push the insert into the holder (see below). Position edge of holder on the scribed line and screw into place with self tapping screws.

4) Close the door and check that the seal works correctly.

If necessary the oversized holes in the holder allow slight adjustment.


IMPORTANT NOTES
The hinge edge of the door must be well rounded to avoid crimping of the insert.
When fitting the insert press it into the holder, points first and smoth the surface of the tube along the complete length.
These inserts must not be allowed to come into contact with solvent based glues, varnishes and paints etc. The inserts should be removed when redecorating and replaced when the pain is dry.
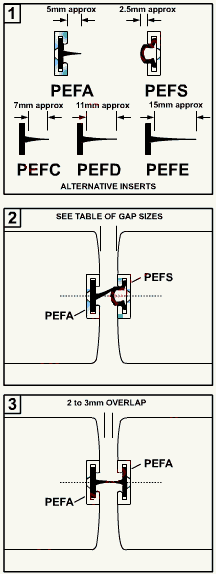
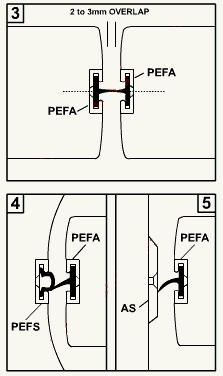
FITTING INSTRUCTIONS for PEF Range of Wiping Seals.

Seals for Double-Acting Double Leaf Pivoted Doors

These seals are primarily intended for double acting double leaf doors opening through 180°. There are many other situations, however, where wiping seals are required and the PEF range can be used effectively. Before starting to fit the seal refer to the drawings in Fig.1 to identify the sealing insert which has been supplied.

SEALING MEETING STILES
The aluminium holders are supplied with a milled slot, 100mm from one end, to facilitate inserting the elastomeric seal as the seals are housed in a groove and both ends are concealed. The slot does not affect the proper working of the seal.

The blade section is fitted by inserting the end into the slot and pulling it along the holder, or into the holder if there is no slot. The PEFS pvc is sprung into the holder from the front.

Unwanted movement of the insert is avoided by crimping the ends of the holder.

The seals can be surface mounted, but, in most cases, as in meeting and pivot stiles, the holder is rebated into a groove 17mm wide x 5mm deep.

The gaps between the surfaces to be sealed must be large enough to allow the sealing blades to function correctly. When used in conjunction with PEFS pvc insert the recommended gap sizes are:

PEFA PEFC PEFD PEFE
6mm 8mm 12mm 16mm

If PEFS is not being used deduct 2mm from these sizes (see Fig.2).

When two blades are used opposite each other they should overlap by 2-3mm according to the size of the blade Fig.3.

SEALING PIVOT STILES

If doors are mounted between curved timber jambs PEFA/C/D or E, as appropriate, is recessed in the door edge and the blade wipes on PEFS in the jamb face. Fig.4.

If the jamb is flat the blade seal in the door edge wipes on the jamb itself or onto an AS aluminium strip mounted on the jamb face Fig.5.

To prevent damaging the insert the edge of the meeting and pivot stiles should be well rounded as shown.

Solvent glues, paints etc. must not be allowed to come into contact with the sealing insert strip.
See our soundproofing seals product section for details of prices of what we can provide