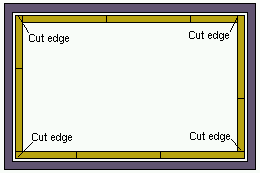
If panelling is to run into the corners of a room, the neatest method is as shown above. Because no panel run has more than cut edge at each end, these will be hidden by the edge of an uncut panel.
WALLSORPTION acoustic wall panels are easily cut with a sharp kitchen or craft knife. UPVC trims can be cut with either a fine toothed fret saw or hacksaw.
WALLSORPTION acoustic wall panels should be stored in a completely dry and room temperature environment. They are designed for installation under standard occupancy conditions from 10-25oC and not more than 60% RH in an enclosed building.
Fabric coverings can be wiped clean with a damp cloth and vacuumed or brushed periodically.
The contractor shall be responsible for the examination and acceptance of all conditions and project suitability prior to installation of the wall panels.
TYPE B: BUTT JOINT ACOUSTIC PANEL SYSTEM
FIXING GUIDE
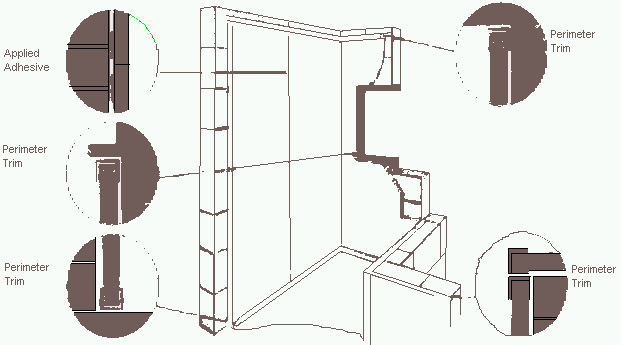
- Screw fix Upvc female perimeter trim to top, bottom and end of walls.
- Cut panels to soze. Position individual Butt Joint panels to fit between the female perimeter trims. Ensure that the visible panel butt joints are tight and straight.
- Remove panels away from the wall and apply an even brush coat of contact adhesive (approx. 100mm wide x 150mm long strip) on the wall to coincide with the perimeter edge of the rear of the panels about half way down the panel height and allow to touch dry for about 15 minutes. Then apply a similar strip of adhesive on the corresponding position on the back of the panels so they coincide with the glue positions on the wall. Allow to touch dry (10-15 minutes). Carefully reposition the panels in the original positions. The panels must be carefully repositioned as once contact is made with the adhesive they cannot be readjusted.
- Push fit top, bottom and end male perimeter trims into female trims. Ensure that all trims and panels are fully pushed in and located.
If paneling runs generally end in a corner of a room the neatest method of installation is shown above. Because no panel run has more than one cut edge at each end therefore all these are hidden in corners by the uncut panel. This eliminates the need for any internal corner trims hence resulting in a neater finish.
NOMINAL DIMENSIONS
Panel Size:   2700mm x 1200mm
Thickness:   25mm
White Upvc fixing trims:   2700mm lengths
TYPE A: TEE JOINT ACOUSTIC PANEL SYSTEM
FIXING GUIDE
- Screw fix Upvc female perimeter trim to top, bottom and end of walls.
- Screw fix Upvc female 'T' joint, trim vertically between top and bottom Upvc female perimeter trims, allowing for the panels width and height.
- Cut and insert individual panels to fit between female perimeter and female 'T' joint trims. Push fit top and bottom male perimeter trims then neatly cut vertical male perimeter and vertical male 'T' joint trims to fit between the top and bottom perimeter trims and push fit togeather. Make sure to place the 'pullstrip' labelled end upwards. Insure that all trims are fully pushed in and located.
 For heights greater than
2.7m panel height, use 'T'
joint trim horizontally
For heights greater than
2.7m panel height, use 'T'
joint trim horizontally
INSTALLATION
Use a spirit level to align all horizontal and vertical surfaces. Drill oversized holes in the Upvc female trims larger than the screw shank but smaller than the screwhead. Use the 'V' line as a guide. Screw fix at maximum of 400mm centres.NOMINAL DIMENSIONS
Panel Size:   2700mm x 1200mm
Thickness:   25mm
White Upvc fixing trims:   2700mm lengths
TYPE C: SHADOW JOINT ACOUSTIC PANEL SYSTEM
INSTALLATION TO WALLS
Panels are fixed with contact adhesive. This is a simple and strong adhesive system for bonding the panels to walls or ceilings. Panels can be applied direct to concrete , brickwork, wood, plaster or metal. There is an immediate bond, therefor no mechanical support is required or the need for drilling any fixing holes.
SURFACE PREPARATION
The wall or ceiling must be clean, dry and free from loose paint, plaster, dust etc. Wallpaper should be removed, gloss paint roughened and emulsion paint brushed with a stiff brush to ensure it is firm. On absorbent surfaces an initial priming coat may be necessary and should be allowed to dry for at least 30 minutes before applying the bonding coat.
FIXING PANELS
Mark the position of the panels on the wall. Apply an even brush of contact adhesive (approx. 100mm wide x 200mm long strips) on the wall to coincide with the perimeter edge on the rear of the panel at maximum of 900mm centers and allow to touch dry for about 15 minutes. Also apply an even brush coat of adhesive on the corresponding positions on the back of the panel so they coincide with the positions on the wall. Allow to touch dry (10-15 minutes). Carefully position the panel, fit one corner first, then aligh vertically and horizontally. Apply even, firm pressure along the lines of the adhesive positions. The panels must be carefully positioned as once contact is made they cannot be readjusted.
NOMINAL DIMENSIONS
Panel Sizes:   2700mm x 1200mm
2400mm x 1200mm
2100mm x 1200mm
1800mm x 1200mm
1500mm x 1200mm
1200mm x 1200mm
900mm x 1200mm
Thickness:   25mm
White Upvc fixing trims:   2700mm lengths