

Designed to substantially improve the sound insulation of existing walls and ceilings where it is impractical to use other forms of sound insulation. The Sound Reducing Resilient Bar System is used along with plasterboard and is particularly effective when applied to ceilings. This inexpensive system is easy to install and can be undertaken by anyone with a little DIY experience or a local builder.
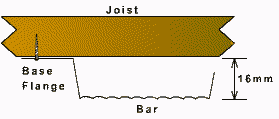
If not fitted directly beneath the floor joists, Sound Reducing Resilient Bars can be supported by 50mm2 battens screwed to the underside of any existing ceiling. (See installation instructions available from the address below for more specific details). Plasterboard is then screwed to the corrugated section of the bar and for best results, two layers totalling 30mm thickness should be installed. Alternatively, two layers of 12.5mm plasterboard Sound Block can be used. A greater sound insulation improvement can be gained if Acoustic Mineral Wool (AMW50) is installed between the battens before fixing the plasterboard. AMW50 is also available from the address detailed below.
When installed beneath an existing ceiling with AMW50 and 30mm of plasterboard applied, improvements in both airborne noise and impact sound would normally be well in excess of 300%
Fire resistance with 30mm of plasterboard or 25mm of Sound Block applied would be 1 hour.
Length					3m
Overall thickness			16mm
Steel gauge				0.5mm
Weight					0.37kg/m
Width					70mm
Depth					15mm
It is extremely important to install Resilient Bars correctly. Improper installation will nullify any advantage gained from using it in the first place.
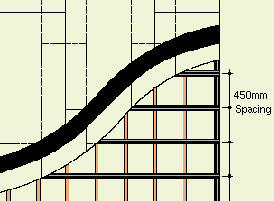
There are a few simple procedures that need to be followed when using Resilient Bars. On walls, the Resilient Bars should be mounted at 450mm centres perpendicular to the framing with the narrow flange along the bottom. This allows the plasterboard's weight to draw itself away from the framing. For ceilings, the bars should be spaced the same as for walls but fitted across either the joists or battens to which they are to be fixed and also around the perimeter. See diagram below.
Cut-away ceiling plan alongside (12.5 x 1200 x 2700mm plasterboard over 19mm plasterboard plank fixed to Resilient Bars)

Cutting of Resilient Bar can easily be carried out with either tinsnips or a hacksaw.
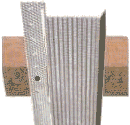
If fitted to the underside of an existing ceiling, 50mm battens should first be screwed to the ceiling at 600mm centres, right angled to the joists. Care must be taken to ensure the battens are fixed through to the joists and NOT just to the plasterboard. On walls, the bars should be similarly mounted at right angles to the framework with the narrow fixing flange at the bottom and the webbed flange topmost. This allows the plasterboard to flex away from the studwork.
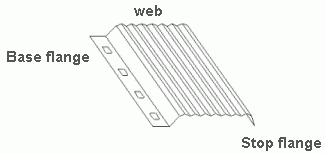
Resilient Bar is made from hot-dipped galvanised steel incorporating a corrugated web to which plasterboard is screwed. The base flange has rectangular holes which enable the bar to be screwed to the substrate.
When resilient channels are properly installed, it should be possible to slightly flex the wall or ceiling surface. A lack of flex indicates that the channels are shorted out by screws fastened into the wood framing. Also, it usually does not matter which side of the wall is resiliently hung.